Production
Published production: What you did to create the final images and materials (assets) for the DPS in Photoshop
Viral video (screen grabs/quicktime of post production/editing) are missing as were lost, (link to youtube address)
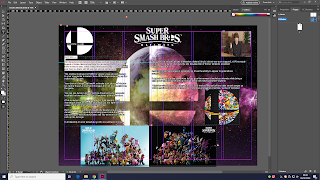
The characters in SSBU inside the logo with the name of the game below.
The SSBU smash ball logo in a sort of futurstic space format.
The creator of SSBU Masahiro Sakurai
The SSBU cast in daylight/pure format of the characters featured in the game.
Darker/evil version of some of the characters featured in the game.
 My dps using indesign to add font and move images around making appropriate placement for everything to increase the aesthetic appeal.
The smash bros logo which i enlarged and changed the colour from white to black.
Making DPS
While using indesign this is what i did:(missing screengrabs)
- Created style sheets so all my paragraphs had the official SSBU font, and were the same size and colour
- Set up a double page spread by modifying how the pages where shown so it was 2 together instead of one
- Moved images around, using the shrink tool to modify the size of images to a suitable size and placing them in appropriate places
In photoshop I did:
I used the crop tool to trim the edges of the images to make them smaller.
- On the SSBU logo I changed the colour of the text to black and enlarged the image making it bigger and more prominent.
The images i have used in my dps aren't of my own making and are owned by Nintendo and other parties and if the product was being released into the real world/society i would get permissions for things such as graphics/ images and/or music and i would pay to use it if payment was needed.
What did I do with the camera/The setup?
The first thing I did was setup the tripod/legs and position them in the room where I'd be filming.
I then put the camera on the tripod locking it into place, then slot the battery into place and turned it on.
We had to white balance by holding a sheet of paper in front of the lens while pressing the AWB button (Auto white balance).
Then I had to connect the shotgun mic to the camera using the 3 pin XLR cable, make sure you've also connected the headphone jack to the camera if your got everything correct you should be able to hear out of both sides of the headphones.
Editing process
Over the holidays i will be uploading screen grabs of my video as well as hopefully the video itself on you tube which will include both interviews, but my interviews will also be placed separately.
Interviews
Blogger had a problem with my videos so ive given a link to my youtube channel where the video is located.


1. You need to put your final double page in here with screen grabs, with explanations of how you built it.
ReplyDelete2. You also need to put in here screen grabs of the way you created your video in premier pro, again with explanations of what you did.
3. There should be a link to youtube where you video is uploaded
4. The final double page should be uploaded in a jpg after you have saved it in photoshop from the pdf you exported in Indesign (see me if this confuses you!)
This needs to be done next week / over half term as a final deadline
A bit more on the building process in Indesign please as you did lots of complex good stuff!
ReplyDeleteAdd an explanation against each picture! Talk about techniques in Indesign and Photoshop. Represent you good SW skills!
Repeat really:
ReplyDelete"A bit more on the building process in Indesign please - as you did lots of complex good stuff!
Add an explanation against each picture! Talk about techniques in Indesign and Photoshop. Represent you good SW skills!"